Crafting Your Eden: A DIY Guide to Using ChatGPT for Landscape Design
Published by Oliver on Oct 13, 2023
Introducing an extraordinary tool to the DIY landscape design world, ChatGPT has been a game changer for many enthusiasts looking to transform their outdoor spaces. If you've always dreamt of creating a perfect landscape design for your garden but felt overwhelmed by the complexities, fear no more! This AI-powered assistant can simplify the process, guiding you through each step, from choosing the right plants to laying pavers, and even designing an irrigation system. Let's explore how to harness the power of ChatGPT for your landscape project!
See the end of the article for an example of a landscape plan from ChatGPT, including material lists!
Step-by-Step Process
Step 1: Setting the Scene - Gathering Measurements via Google Maps
Before you dive into the world of botany, it's crucial to know the dimensions of your space. Google Maps can be an invaluable tool for this:
Open Google Maps and find your property.
Right-click on your property's starting point and select "Measure distance" to begin plotting points around the perimeter.
Continue to add points, following the boundaries of your space. Google Maps will automatically calculate the area.
Note down these measurements.

Step 2: Consulting the AI Botanist - Choosing the Best Plants
ChatGPT isn't just a tech tool; it's like your digital horticulturist! Here's how to make the most of it:
Start by asking ChatGPT about the native plants in your area or the best plants for the specific conditions of your garden (e.g., soil type, light exposure, climate zone).
You can also inquire about seasonal plants, maintenance tips, or how to achieve year-round color and texture.
Step 3: Irrigation Innovation - Planning a Watering System
A successful garden thrives on proper irrigation, and ChatGPT can assist in designing a system that suits your landscape's specific needs.
Ask for the basics of setting up a drip irrigation or sprinkler system.
Discuss the layout of your garden, specifying any trees, shrubs, or garden beds that need particular attention.
Don't forget to ask about water conservation tips!
Step 4: Listing It Down - Getting a Concise Materials List
Avoid the hassle of back-and-forth trips to the garden store by asking ChatGPT to generate a comprehensive list of materials needed for your project. This can include anything from soil and fertilizer types to the number of pavers or plants.
Step 5: The Perfect Path - Laying Pavers
A path of pavers adds charm and functionality to your garden. ChatGPT can provide a step-by-step guide on laying pavers, including tips on:
Preparing the area (e.g., marking the territory, removing grass, leveling the ground).
Placing the pavers in your desired pattern.
Setting and sealing the pavers for a professional finish.
Step 6: Green Thumbs-Up - Planting Your Plants
The heart of your landscape design is, undoubtedly, the plants. For detailed planting instructions, turn to ChatGPT:
Ask about the best time for planting your chosen species.
Request guidance on spacing, depth, and a suitable planting technique.
Seek advice on initial watering and care.
Conclusion:
Using ChatGPT for your DIY landscape design project makes the process not only manageable but genuinely enjoyable. This innovative tool offers a reservoir of gardening knowledge and practical advice, tailored to your garden's unique requirements. Whether you're laying a tranquil path through your flower beds, installing an efficient irrigation system, or selecting plants that will thrive in your local climate, ChatGPT is there to guide you every step of the way. Ready to craft your Eden? Engage with ChatGPT and let your garden's transformation begin!
EXAMPLE: Comprehensive Landscape Project Plan for a Water-Saving Garden in Zone 9a
Overview: This detailed project plan aims to guide DIY gardeners through establishing a 1000 square foot water-conserving garden in Zone 9a. Emphasis is placed on the selection of drought-resistant plants, efficient irrigation, and sustainable landscaping practices.
Step 1: Area Measurement
1000 sqft
Step 2: Plant Selection and Quantity
Select plants that are drought-resistant and thrive in Zone 9a. Here’s a suggested list with quantities, considering a 1000 sqft area:

Note: The quantities are approximate and should be adjusted based on your specific garden design and spacing requirements for each plant species at maturity.
Step 3: Irrigation System
Implement a drip irrigation system for water efficiency, directing water to the plants’ roots, minimizing evaporation, and reducing water run-off.
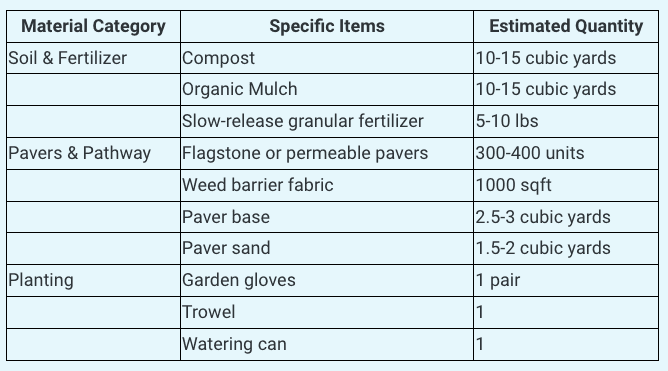
Step 4: Materials
General Landscaping Materials:

Irrigation System Materials:

Step 5: Laying Pavers
Mark the pathway area and remove grass and topsoil to a depth of about 6-8 inches.
Install the weed barrier, followed by the paver base, which should be compacted and leveled.
Add paver sand and then arrange the pavers in the desired pattern.
Fill the joints with sand, compact, and seal to stabilize the pavers.
Step 6: Planting
Prepare the soil by mixing in the required amount of compost.
Dig holes, keeping in mind the mature size of the plants for proper spacing.
Plant, backfill with a soil-compost mixture, and water generously.
Add mulch around the plants to retain moisture and regulate soil temperature.
Step 7: Drip Irrigation Installation
Plan the layout, ensuring all plantings will receive water.
Assemble the components at the water source: timer, filter, and pressure regulator.
Lay out the main distribution tubing.
Punch holes and install drip emitters by plants.
Run smaller tubing to plants farther from the main line.
Secure all components with stakes or hold downs.
Test the system and adjust as necessary.
Set the timer considering the watering needs of your plants and local regulations.
Conclusion
This all-inclusive landscape project plan equips DIY enthusiasts in Zone 9a with the necessary steps, quantities, and guidance to establish a water-efficient garden. By emphasizing drought-resistant plants, strategic plant quantities, and an effective irrigation system, this garden design promotes sustainability and water conservation. Now, with a complete understanding of what's needed in terms of plants and materials, you're ready to bring your water-saving garden to life! Remember, these quantities are flexible and can be adjusted to suit your garden's specific design requirements and your personal preferences. Happy gardening!
Other tools
While transforming your outdoor space is exciting, you might also want to reimagine your interiors. Check out Fix The Photo virtual staging – a tool designed to help you visualize beautifully styled interior spaces, making it perfect for home staging or planning your next indoor renovation.

